User-100208273 (talk | contribs) (I guess nuby tutorial by bad explainer) |
m (Protected "Logic Tutorial: Animation": High traffic page ([Edit=Allow only administrators] (expires 14:04, 20 October 2021 (UTC)) [Move=Allow only administrators] (expires 14:04, 20 October 2021 (UTC)))) |
||
| (10 intermediate revisions by 7 users not shown) | |||
| Line 1: | Line 1: | ||
| − | + | A logic animation system is usually made with the following logic cubes: '''Delay Cube''', '''Cube Model Hider''', '''Pressure Plate''' or '''Lever''', and any models you want to animate. |
|
| + | == Materials == |
||
| + | #[[Models]] |
||
| + | #[[Delay_Cube]] |
||
| + | #[[Cube_Model_Hider]] |
||
| + | #[[Pressure_Plate]] |
||
| + | #[[Lever]] |
||
| + | #[[Text]] |
||
| + | #[[Negate_Cube]] |
||
| − | == |
+ | == Steps == |
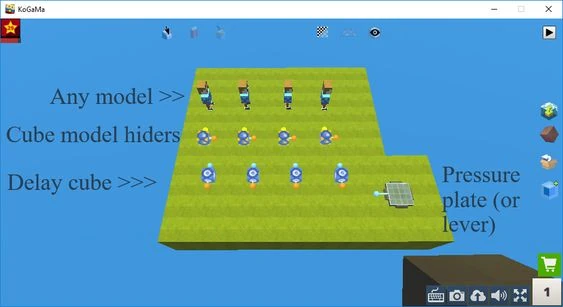
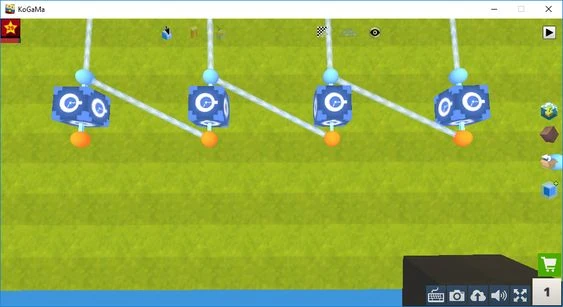
| − | + | We'll start with 4 frames of the animation, so 4 models. Let's explain the first image. |
|
| − | [[File:Koganimation.jpeg|thumb| |
+ | [[File:Koganimation.jpeg|thumb|Studying images should help for a better understanding.]] |
| + | The number of frames in the animation can be as high as you want/as high as necessary. |
||
| − | However, how many "moves" the model should has, is at your patience and cretivity (more moves - more times which it took). |
||
| − | + | The '''Cube model hider's''' yellow logic connector can only be connected to models; follow the image's example. Each yellow logic connector from '''Cube model hider''' should be connected to a model. |
|
[[File:Yellow-cube.jpeg|thumb|]] |
[[File:Yellow-cube.jpeg|thumb|]] |
||
| − | Now |
+ | Now connect the '''Delay cubes''' to the '''Cube model hiders''' as the third image shows. |
| − | [[File:Between.jpeg|thumb| |
+ | [[File:Between.jpeg|thumb|First Delay Cube connected to first Cube Model Hider, second Delay Cube connected to second Cube Model Hider, etc.]] |
| − | And now the harder part. For orientation, we |
+ | And now the harder part. For orientation, we first edit delay at model, which will begin in the animation (examine the fourth image to understand). Also it means we must set delay to 0. Of course, that's still an example, you can add delay at start also. |
| − | [[File:Time.jpeg|thumb| |
+ | [[File:Time.jpeg|thumb|Settings on image are just to demonstrate. ]] |
| − | Other '''Delay cubes''' |
+ | Other '''Delay cubes''' will have both - if we make an animation without slow-motion between models - same time in seconds as in the first (At our example in the fifth image, it means 0.7 delay and duration in other '''Delay cubes'''). |
| − | However, if you wanna keep the model still at the last "move", then do exception in the last delay and |
+ | However, if you wanna keep the model still at the last "move", then do an exception in the last delay and put duration to 1000 (or a time which is very long for the player). |
| − | [[File:Lapses.jpeg|thumb|Now connect Delay cubes |
+ | [[File:Lapses.jpeg|thumb|Now connect Delay cubes, using this image for guidance.]] |
| − | And |
+ | And at the last, connect '''Pressure plate''' or '''Lever''' to the orange dot of '''Delay cube''', which we edited first. |
| + | NOTE: If you want to make this infinite, use a [[Pulse Cube]]! |
||
| ⚫ | |||
| ⚫ | |||
| ⚫ | |||
| ⚫ | |||
| − | == Other pages to here said things == |
||
| ⚫ | |||
| − | https://kogama.gamepedia.com/Models |
||
| ⚫ | |||
| − | https://kogama.gamepedia.com/Delay_Cube |
||
| − | https://kogama.gamepedia.com/Cube_Model_Hider |
||
| − | https://kogama.gamepedia.com/Pressure_Plate |
||
| − | https://kogama.gamepedia.com/Lever |
||
| − | https://kogama.gamepedia.com/Text |
||
| − | https://kogama.gamepedia.com/Negate_Cube |
||
Latest revision as of 14:04, 20 September 2021
A logic animation system is usually made with the following logic cubes: Delay Cube, Cube Model Hider, Pressure Plate or Lever, and any models you want to animate.
Materials[ | ]
Steps[ | ]
We'll start with 4 frames of the animation, so 4 models. Let's explain the first image.
Studying images should help for a better understanding.
The number of frames in the animation can be as high as you want/as high as necessary. The Cube model hider's yellow logic connector can only be connected to models; follow the image's example. Each yellow logic connector from Cube model hider should be connected to a model.
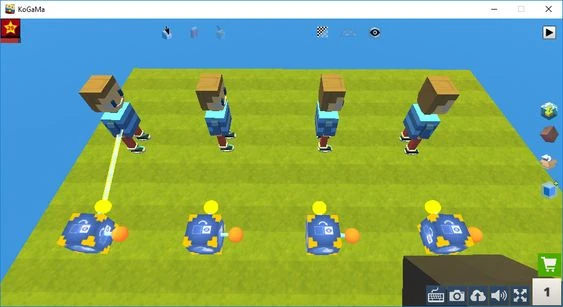
Now connect the Delay cubes to the Cube model hiders as the third image shows.
First Delay Cube connected to first Cube Model Hider, second Delay Cube connected to second Cube Model Hider, etc.
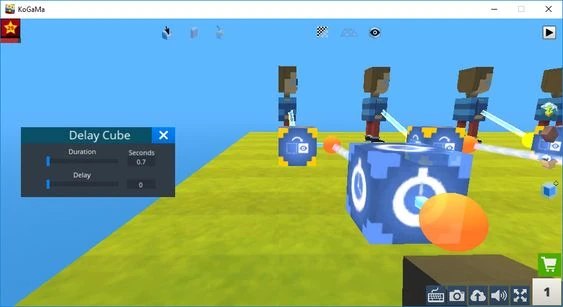
And now the harder part. For orientation, we first edit delay at model, which will begin in the animation (examine the fourth image to understand). Also it means we must set delay to 0. Of course, that's still an example, you can add delay at start also.

Settings on image are just to demonstrate.
Other Delay cubes will have both - if we make an animation without slow-motion between models - same time in seconds as in the first (At our example in the fifth image, it means 0.7 delay and duration in other Delay cubes). However, if you wanna keep the model still at the last "move", then do an exception in the last delay and put duration to 1000 (or a time which is very long for the player).
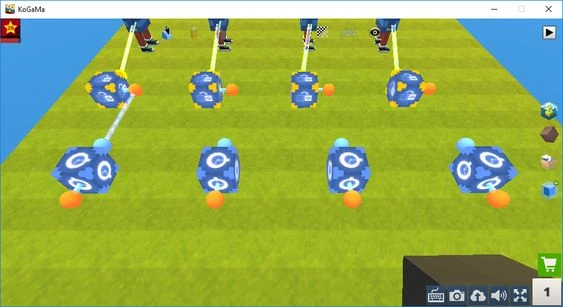
Now connect Delay cubes, using this image for guidance.
And at the last, connect Pressure plate or Lever to the orange dot of Delay cube, which we edited first.
NOTE: If you want to make this infinite, use a Pulse Cube!
Animated text[ | ]
Well, that stays almost the same, except for the Cube model hiders, instead of them there will be Negate cubes, and instead of models we shall use Text cubes. Also for good effect, set all the Text cubes together after finishing the system.