No edit summary |
Tag: Visual edit |
||
| (17 intermediate revisions by 9 users not shown) | |||
| Line 1: | Line 1: | ||
| − | In KoGaMa you can '''create incredible games''' for |
+ | In [[Kogama|KoGaMa]] you can '''create incredible games''' for the [[community]] to enjoy (these [[games]] can fall into multiple categories, such as [[Parkour (game genre)|Parkour]], [[PvP|PVP]], [[Adventure game|Adventure games]], [[Horror|horror movies]], love lands, cube guns, [[Racing (game genre)|racing]], speedruns, droppers and others), and the creation of games makes up a core part of KoGaMa as a whole. In this article you will learn everything you need to start creating. |
== Create a Project == |
== Create a Project == |
||
| − | [[File:CreateProject.gif|300px|thumb|left|Creating Project]] At the top of the page you can select the Build option, |
+ | [[File:CreateProject.gif|300px|thumb|left|Creating Project]] At the top of the page you can select the Build option, which will take you to a page displaying all your projects, those you own and those you are a member of. |
| − | 1. Click |
+ | 1. Click on '''New Game'''. |
| − | 2. Select the '''template''' you are most interested in. [[File:EnterProject.gif|300px|thumb| |
+ | 2. Select the '''template''' you are most interested in. [[File:EnterProject.gif|300px|thumb|right|Entering a Project]] |
| − | 3. Enter a name and description for your game. |
+ | 3. Enter a name and description for your game. If you want, you can change it later |
| − | 4. Now that you have created your project, it will appear in the '''build''' tab where you can enter. |
+ | 4. Now that you have created your project, it will appear in the '''build''' tab where you can enter it. |
| ⚫ | |||
| − | |||
| ⚫ | |||
| − | |||
| ⚫ | |||
| ⚫ | |||
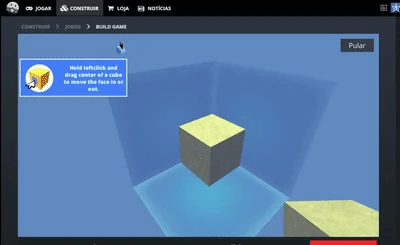
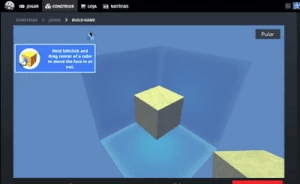
[[File:FirstComands.gif|300px|thumb|right|Tutorial]] |
[[File:FirstComands.gif|300px|thumb|right|Tutorial]] |
||
| − | 1. The keys W A S D move your character |
+ | 1. The keys W A S D move your character along the x and z planes (horizontally) |
'''W (Front)''' |
'''W (Front)''' |
||
| Line 27: | Line 25: | ||
'''D (Right)''' |
'''D (Right)''' |
||
| − | 2. The E and C keys move your character |
+ | 2. The E and C keys move your character up and down the y plane (vertically): |
| − | '''E (Top)''' |
+ | '''E/SPACE (Top)''' |
| − | '''C (Down)''' |
+ | '''C/CTRL (Down)''' |
| − | 3. You can |
+ | 3. You can move your mouse to change the camera's position and direction. |
== Cubes == |
== Cubes == |
||
| − | Ready! You've just learned the |
+ | Ready! You've just learned the controls, but now let's get to the fun part, which is the cubes. |
[[File:AddCubes.gif|300px|thumb|left|Cubes]] |
[[File:AddCubes.gif|300px|thumb|left|Cubes]] |
||
| − | 1.[[File:Change Block.PNG]] To add cubes, first type 1, |
+ | 1.[[File:Change Block.PNG]] To add cubes, first type 1, or select the '''edit cube''' option at the top, after clicking on the small cube that appears to the right side of the screen, there you can select a myriad of textures and materials. |
| − | 2.[[File:DeletCube.PNG]] To delete cubes, type 2, |
+ | 2.[[File:DeletCube.PNG]] To delete cubes, type 2, or select the '''delete cube''' option at the top. Clicking on a block with this activated will delete the block. [[File:Modeling.gif|300px|thumb|Right|Modeling]] |
| − | 3.[[File:PaintCube.PNG]] To paint cubes, type 3, |
+ | 3.[[File:PaintCube.PNG]] To paint cubes, type 3, or select the '''paint cube''' option at the top; with this you can paint any block selected a chosen texture. |
| + | * The cubes can be edited in multiple ways, through sloping, thinning, painting or deleting them, which allows you to create anything you want. |
||
| − | * If the cubes you can modeling, modeling is everything in construction mode, nothing more is that change the shape of the blocks you want, so you can form various types of items and can create your maps. |
||
== Construction Tools == |
== Construction Tools == |
||
| − | *[[File:Grad Size.PNG]] ''' |
+ | *[[File:Grad Size.PNG]] '''Grid Size''' (G key shortcut) = With this tool you can toggle the grid size of your game to move models: in 1 mode you are able to move the model along a 1/4 small block plane, and in 2 mode you move it along a 1/1 large block plane. |
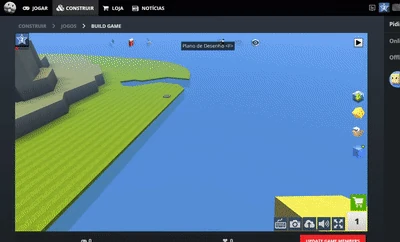
| − | *[[File:DrawPlan.PNG]] '''Drawing Plane''' (F key shortcut) = With this tool you are able to |
+ | *[[File:DrawPlan.PNG]] '''Drawing Plane''' (F key shortcut) = With this tool you are able to show the building plane, and put blocks, models on it. You can change the height of this plane by using the arrows that appear on the left side. Above this there is a multi coloured cube, with three sides visible. Selecting one of these will change the grids orientation, making it horizontal, vertical on the y, and vertical on the z axes. [[File:PlanCubes.gif|200px|thumb|right|Drawing Plane Example]] |
| − | *[[File:OffLogic.PNG]] '''Show On/Off Logics''' (L key shortcut) = With this tool you hide/show logic blocks |
+ | *[[File:OffLogic.PNG]] '''Show On/Off Logics''' (L key shortcut) = With this tool you can hide/show logic blocks in your game; this will not disable them, simply conceal them from view.. |
| − | *[[File:Play.PNG]] '''Test Game''' (P key shortcut) = With this you can test your game, as if it were already published. |
+ | *[[File:Play.PNG]] '''Test Game''' (P key shortcut) = With this you can test your game, as if it were already published, by playing it. |
== Models == |
== Models == |
||
| − | You can create models using N key shortcut, or selecting [[File:Model.PNG|40px]] on the right side of the screen, then simply |
+ | You can create models using the N key shortcut, or selecting [[File:Model.PNG|40px]] on the right side of the screen, then simply choosing the desired size and then the location where it will be made. Models have a limited building field of 24x24x24 blocks, with the size of each block increasing based on the chosen model size. |
| − | *With |
+ | *With models you also have the ability to store them in your inventory for future use, plus the ability to share them, selling your creations to the game store, which can be found at the top of KoGaMa's official website, next to the build option. If someone buys your model you get 1 gold (10%) or if you have an elite subscription, 7 gold (70%), of the models price of 10 gold. |
== Inventory == |
== Inventory == |
||
| − | The inventory can be accessed |
+ | The inventory can be accessed through the icon [[File:Inventory Icon.PNG|40px]], or by using the shortcut key I. This is the place where you store the items you get, such as models, logics, pickups ... In total there are 6 item categories |
| − | *[[Models|'''Cube Models''']] |
+ | *[[Models|'''Cube Models''']] These are ready-made models purchased at the [[Item Store]], or the ones created by you that have been added to the inventory. |
*'''[[Premium Models]]''' They are the original game models purchased in the in-game store. |
*'''[[Premium Models]]''' They are the original game models purchased in the in-game store. |
||
| Line 69: | Line 67: | ||
*'''[[Pickups]]''' Refers to items collected within the game, such as weapons, coins, stars |
*'''[[Pickups]]''' Refers to items collected within the game, such as weapons, coins, stars |
||
| − | *'''[[ |
+ | *'''[[Blueprints]]''' Refers to usable items during the game |
*'''[[Logic]]''' Simple logic items such as light, final flag, texts... |
*'''[[Logic]]''' Simple logic items such as light, final flag, texts... |
||
| − | *'''[[Advanced Logic]] Refer to the category for some Logic Cubes. |
+ | *'''[[Advanced Logic]] Refer to the category for some Logic Cubes used to create more complex systems.''' |
=== Shop === |
=== Shop === |
||
[[File:Selling Item.gif|200px|thumb|right|Selling Item Example (Click Here)]] |
[[File:Selling Item.gif|200px|thumb|right|Selling Item Example (Click Here)]] |
||
| − | The store is a |
+ | The store is a section in which you can sell your creations to other players; with each purchase of your model you receive 1 gold. |
| − | To sell |
+ | To sell a model, you need to have your model in your inventory, to do this you need to: |
| − | *Right-click on your |
+ | *Right-click on your model and select the add to inventory option. This may take a few seconds. |
| − | *After that, open your inventory, |
+ | *After that, open your inventory, find your item and click on the [[File:Item info Icon.PNG]] at the bottom right of your item. |
| − | *Click on the sell option... Write a name for your item and description |
+ | *Click on the sell option... Write a name for your item and a description. |
| − | Now your item will be in the game store, you can see it by accessing the |
+ | Now your item will be in the game store, you can see it by accessing the marketplace tab of your profile, its photo will be taken automatically |
== Logic == |
== Logic == |
||
| − | Game logic controls the gameplay of the game. It's based |
+ | Game logic controls the gameplay of the game. It's based on programming and it can be as complex as the creator wishes, or is needed. There are various Logic cubes which provide a large number of combinations. |
You can read and learn more about logic by accessing [https://kogama.gamepedia.com/Tutorial:_Logic_Systems this] article. |
You can read and learn more about logic by accessing [https://kogama.gamepedia.com/Tutorial:_Logic_Systems this] article. |
||
| Line 97: | Line 95: | ||
After you finish your game, just publish it to make it playable to any player on the site. For this: |
After you finish your game, just publish it to make it playable to any player on the site. For this: |
||
| − | * Click |
+ | * Click on the [[File:Publish Game Icon.PNG]] that appears at the bottom right of your screen. |
*When you are ready click '''Ok''' |
*When you are ready click '''Ok''' |
||
| − | A loading screen will appear, which usually |
+ | A loading screen will appear, which usually takes a while to finish processing. After this your game will be published on the site; to access it you can visit your profile, and go to your published games section |
== Taking Screenshot == |
== Taking Screenshot == |
||
[[File:Screeenshot Example.gif|200px|thumb|right|Screeenshot Example]] |
[[File:Screeenshot Example.gif|200px|thumb|right|Screeenshot Example]] |
||
| − | + | Every game features a thumbnail; this may attract new players to your map. You can take one showing off elements of the game, such as scenery, logos ... Anything within your project could be featured in the screenshot. After finding ideal position for the screenshot, you must: |
|
| − | *Click the [[File:Screenshot Icon.PNG]] that appears |
+ | *Click the [[File:Screenshot Icon.PNG]] that appears at the bottom right of the screen, next to the publish game icon. |
*When you are ready click '''Ok''' |
*When you are ready click '''Ok''' |
||
The loading usually does not take long, much like the publication of the game. After this, your game will have an updated photo! |
The loading usually does not take long, much like the publication of the game. After this, your game will have an updated photo! |
||
| + | |||
| + | '''Note: You can't Take a screenshot on the launcher, You must use the browser version to be able to take a screenshot''' |
||
| + | |||
| + | === Translations === |
||
| + | [[Tutorial: Build Games/pt|Portuguese (PT)]] |
||
| + | |||
| + | [[Tutorial: Build Games/pt-br|Portuguese (BR)]] |
||
[[Category:Game Modes]] |
[[Category:Game Modes]] |
||
Revision as of 22:03, 16 March 2021
In KoGaMa you can create incredible games for the community to enjoy (these games can fall into multiple categories, such as Parkour, PVP, Adventure games, horror movies, love lands, cube guns, racing, speedruns, droppers and others), and the creation of games makes up a core part of KoGaMa as a whole. In this article you will learn everything you need to start creating.
Create a Project
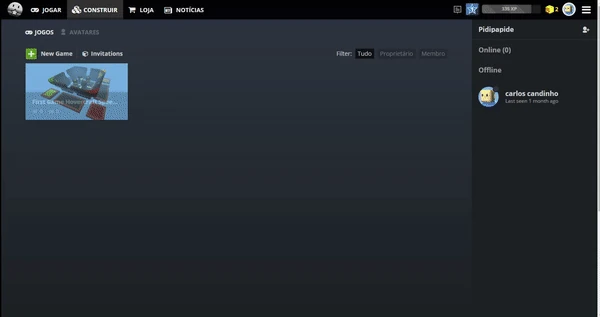
Creating Project
At the top of the page you can select the Build option, which will take you to a page displaying all your projects, those you own and those you are a member of.
1. Click on New Game.
2. Select the template you are most interested in.
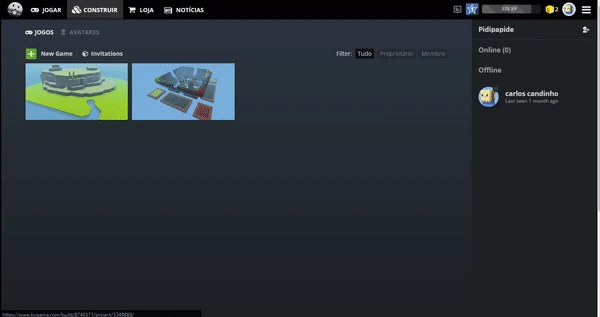
Entering a Project
3. Enter a name and description for your game. If you want, you can change it later
4. Now that you have created your project, it will appear in the build tab where you can enter it.
First Commands
When entering for the first time, a brief tutorial will appear on construction. If you skipped this, no problem, just follow the article.
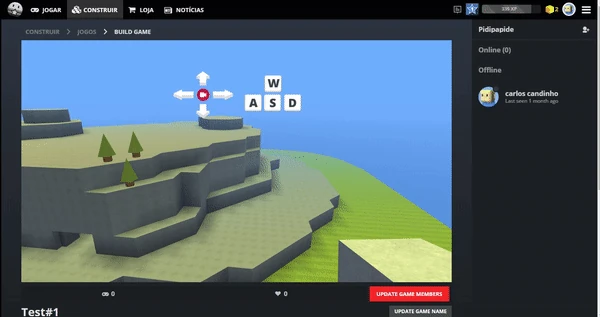
Tutorial
1. The keys W A S D move your character along the x and z planes (horizontally)
W (Front)
S (Back)
A (Left)
D (Right)
2. The E and C keys move your character up and down the y plane (vertically):
E/SPACE (Top)
C/CTRL (Down)
3. You can move your mouse to change the camera's position and direction.
Cubes
Ready! You've just learned the controls, but now let's get to the fun part, which is the cubes.

Cubes
1.![]() To add cubes, first type 1, or select the edit cube option at the top, after clicking on the small cube that appears to the right side of the screen, there you can select a myriad of textures and materials.
To add cubes, first type 1, or select the edit cube option at the top, after clicking on the small cube that appears to the right side of the screen, there you can select a myriad of textures and materials.
2.![]() To delete cubes, type 2, or select the delete cube option at the top. Clicking on a block with this activated will delete the block.
To delete cubes, type 2, or select the delete cube option at the top. Clicking on a block with this activated will delete the block.
Modeling
3.![]() To paint cubes, type 3, or select the paint cube option at the top; with this you can paint any block selected a chosen texture.
To paint cubes, type 3, or select the paint cube option at the top; with this you can paint any block selected a chosen texture.
- The cubes can be edited in multiple ways, through sloping, thinning, painting or deleting them, which allows you to create anything you want.
Construction Tools
 Grid Size (G key shortcut) = With this tool you can toggle the grid size of your game to move models: in 1 mode you are able to move the model along a 1/4 small block plane, and in 2 mode you move it along a 1/1 large block plane.
- Drawing Plane (F key shortcut) = With this tool you are able to show the building plane, and put blocks, models on it. You can change the height of this plane by using the arrows that appear on the left side. Above this there is a multi coloured cube, with three sides visible. Selecting one of these will change the grids orientation, making it horizontal, vertical on the y, and vertical on the z axes.
Drawing Plane Example
- Show On/Off Logics (L key shortcut) = With this tool you can hide/show logic blocks in your game; this will not disable them, simply conceal them from view..
- Test Game (P key shortcut) = With this you can test your game, as if it were already published, by playing it.
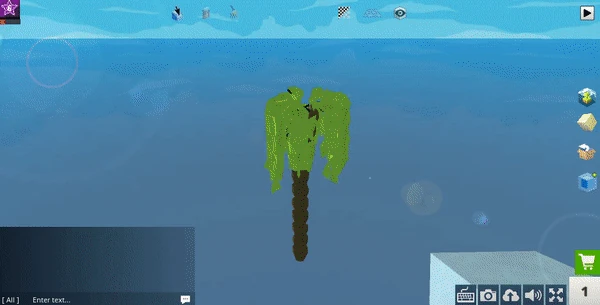
Models
You can create models using the N key shortcut, or selecting ![]() on the right side of the screen, then simply choosing the desired size and then the location where it will be made. Models have a limited building field of 24x24x24 blocks, with the size of each block increasing based on the chosen model size.
on the right side of the screen, then simply choosing the desired size and then the location where it will be made. Models have a limited building field of 24x24x24 blocks, with the size of each block increasing based on the chosen model size.
- With models you also have the ability to store them in your inventory for future use, plus the ability to share them, selling your creations to the game store, which can be found at the top of KoGaMa's official website, next to the build option. If someone buys your model you get 1 gold (10%) or if you have an elite subscription, 7 gold (70%), of the models price of 10 gold.
Inventory
The inventory can be accessed through the icon ![]() , or by using the shortcut key I. This is the place where you store the items you get, such as models, logics, pickups ... In total there are 6 item categories
, or by using the shortcut key I. This is the place where you store the items you get, such as models, logics, pickups ... In total there are 6 item categories
- Cube Models These are ready-made models purchased at the Item Store, or the ones created by you that have been added to the inventory.
- Premium Models They are the original game models purchased in the in-game store.
- Pickups Refers to items collected within the game, such as weapons, coins, stars
- Blueprints Refers to usable items during the game
- Logic Simple logic items such as light, final flag, texts...
- Advanced Logic Refer to the category for some Logic Cubes used to create more complex systems.
Shop
Selling Item Example (Click Here)
The store is a section in which you can sell your creations to other players; with each purchase of your model you receive 1 gold. To sell a model, you need to have your model in your inventory, to do this you need to:
- Right-click on your model and select the add to inventory option. This may take a few seconds.
- After that, open your inventory, find your item and click on the at the bottom right of your item.
- Click on the sell option... Write a name for your item and a description.
Now your item will be in the game store, you can see it by accessing the marketplace tab of your profile, its photo will be taken automatically
Logic
Game logic controls the gameplay of the game. It's based on programming and it can be as complex as the creator wishes, or is needed. There are various Logic cubes which provide a large number of combinations.
You can read and learn more about logic by accessing this article.
Publishing Your Game

Publishing Game
After you finish your game, just publish it to make it playable to any player on the site. For this:
- Click on the that appears at the bottom right of your screen.
- When you are ready click Ok
A loading screen will appear, which usually takes a while to finish processing. After this your game will be published on the site; to access it you can visit your profile, and go to your published games section
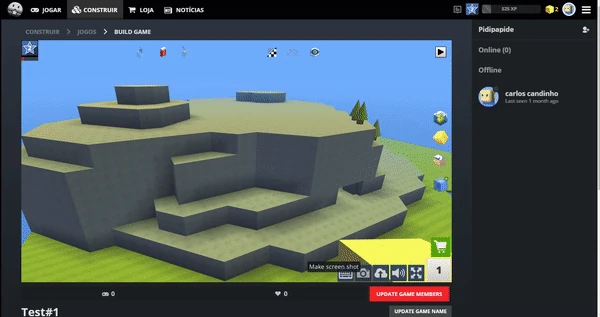
Taking Screenshot

Screeenshot Example
Every game features a thumbnail; this may attract new players to your map. You can take one showing off elements of the game, such as scenery, logos ... Anything within your project could be featured in the screenshot. After finding ideal position for the screenshot, you must:
- Click the that appears at the bottom right of the screen, next to the publish game icon.
- When you are ready click Ok
The loading usually does not take long, much like the publication of the game. After this, your game will have an updated photo!
Note: You can't Take a screenshot on the launcher, You must use the browser version to be able to take a screenshot